How to program in Switchyard
Switchyard is a framework for creating, testing, and experimenting with software implementations of networked systems such as Ethernet switches, IP routers, firewalls and middleboxes, and end-host protocol stacks. It is the framework targeting on teaching and used in University of Wisconsin.
So we have this framework to do some network testing without multiple devices and a bunch of wires. Switchyard documentation is available here. And this is the document you read most often. In this section we will combine Mininet, Wireshark and Switchyard together.
We expect that you have complete How to use Mininet and How to use Wireshark. Next is to learn how to program in Switchyard. We will show you a hub, just forward any input packets to any other interfaces. There are three files for this section.
examples/start_mininet.pyexamples/myhub.pyexamples/hubtests.py
The Switchyard documentation also uses these files to show many useful APIs. Again, this document is very important. You need to read it whenever you get confused with the APIs or Switchyard itself. In this section we do not show you the APIs but the workflow and a little code explanation.
We expect that it will take you up to 4 days on this. It may be a little bit tricky. But this is important.
Install Switchyard
You can find instructions here, the repository of Switchyard on Gitee. A quick note here for Ubuntu.
If you can't find the folder switchyard in your home dictionary, you need to get the source code of Switchyard.
$ git clone https://gitee.com/shellqiqi/switchyard.git
Then you need to get some dependent softwares and libraries.
$ sudo apt-get install libffi-dev libpcap-dev python3-dev python3-pip
You can install Switchyard and the necessary related packages in an isolated Python virtual environment ("venv"), which is the recommended path, or in the system directories, which is often less desirable. The venv route is highly suggested, since it makes all installation "local" and can easily destroyed, cleaned up, and recreated.
To create a new virtual environment, you could do something like the following under your workspace folder switchyard.
$ python3 -m venv syenv
[!WARNING] Many students create their virtual environment under
~so there is a folder~/syenv, which is WRONG. The right path is~/switchyard/syenv.
After this command, you will find a folder syenv in switchyard, which is the folder of the Python virtual environment. You can change the name syenv to whatever you'd like to name your virtual environment. Next, you need to activate the environment. The instructions vary depending on the shell you're using. On bash, the command is
$ source ./syenv/bin/activate
Exactly, activate is a runnable file in the folder syenv. You'll need to replace syenv with whatever you named the virtual environment. If you're using a different shell than bash, refer to Python documentation on the venv module.
Finally, install Switchyard. All the required additional libraries should be automatically installed, too.
$ python3 -m pip install switchyard
Then I suggest to exclude your virtual environment out of git tracking. Add this line in .gitignore if there is not.
syenv/
Prepare Your Test Script
Writing tests to determine whether a piece of code behaves as expected is an important part of the software development process. With Switchyard, it is possible to create a set of tests that verify whether a program attempts to receive packets when it should and sends the right packet(s) out the right ports.
A test scenario is Switchyard’s term for a series of tests that verify a program’s behavior. A test scenario is simply a Python source code file that includes a particular variable name (symbol) called scenario, which must refer to an instance of the class TestScenario. A TestScenario object contains the basic configuration for an imaginary network device along with an ordered series of test expectations. These expectations may be one of three types:
- that a particular packet should arrive on a particular interface/port,
- that a particular packet should be emitted out one or more ports, and
- that the user program should time out when calling recv_packet because no packets are available.
To start off, here is an example of an empty test scenario:
from switchyard.lib.userlib import *

scenario = TestScenario("test example")
For more about writing tests, you need to read Test Scenario Creation.
In later lab assignments, you need to construct test script yourself. But this time we have a template test script helps you. Here is the test script for our hub.
#!/usr/bin/env python3

from switchyard.lib.userlib import *

def mk_pkt(hwsrc, hwdst, ipsrc, ipdst, reply=False):
    ether = Ethernet(src=hwsrc, dst=hwdst, ethertype=EtherType.IP)
    ippkt = IPv4(src=ipsrc, dst=ipdst, protocol=IPProtocol.ICMP, ttl=32)
    icmppkt = ICMP()
    if reply:
        icmppkt.icmptype = ICMPType.EchoReply
    else:
        icmppkt.icmptype = ICMPType.EchoRequest
    return ether + ippkt + icmppkt

def hub_tests():
    s = TestScenario("hub tests")
    s.add_interface('eth0', '10:00:00:00:00:01')
    s.add_interface('eth1', '10:00:00:00:00:02')
    s.add_interface('eth2', '10:00:00:00:00:03')

    # test case 1: a frame with broadcast destination should get sent out
    # all ports except ingress
    testpkt = mk_pkt("30:00:00:00:00:02", "ff:ff:ff:ff:ff:ff", "172.16.42.2", "255.255.255.255")
    s.expect(PacketInputEvent("eth1", testpkt, display=Ethernet), "An Ethernet frame with a broadcast destination address should arrive on eth1")
    s.expect(PacketOutputEvent("eth0", testpkt, "eth2", testpkt, display=Ethernet), "The Ethernet frame with a broadcast destination address should be forwarded out ports eth0 and eth2")

    # test case 2: a frame with any unicast address except one assigned to hub
    # interface should be sent out all ports except ingress
    reqpkt = mk_pkt("20:00:00:00:00:01", "30:00:00:00:00:02", '192.168.1.100','172.16.42.2')
    s.expect(PacketInputEvent("eth0", reqpkt, display=Ethernet), "An Ethernet frame from 20:00:00:00:00:01 to 30:00:00:00:00:02 should arrive on eth0")
    s.expect(PacketOutputEvent("eth1", reqpkt, "eth2", reqpkt, display=Ethernet), "Ethernet frame destined for 30:00:00:00:00:02 should be flooded out eth1 and eth2")

    resppkt = mk_pkt("30:00:00:00:00:02", "20:00:00:00:00:01", '172.16.42.2', '192.168.1.100', reply=True)
    s.expect(PacketInputEvent("eth1", resppkt, display=Ethernet), "An Ethernet frame from 30:00:00:00:00:02 to 20:00:00:00:00:01 should arrive on eth1")
    s.expect(PacketOutputEvent("eth0", resppkt, "eth2", resppkt, display=Ethernet), "Ethernet frame destined to 20:00:00:00:00:01 should be flooded out eth0 and eth2")

    # test case 3: a frame with dest address of one of the interfaces should
    # result in nothing happening
    reqpkt = mk_pkt("20:00:00:00:00:01", "10:00:00:00:00:03", '192.168.1.100','172.16.42.2')
    s.expect(PacketInputEvent("eth2", reqpkt, display=Ethernet), "An Ethernet frame should arrive on eth2 with destination address the same as eth2's MAC address")
    s.expect(PacketInputTimeoutEvent(1.0), "The hub should not do anything in response to a frame arriving with a destination address referring to the hub itself.")
    return s

scenario = hub_tests()
The function mk_pkt is used to make a packet. For now you don't need to know what the parameters means.
The function hub_tests returns a TestScenario object which assigned to scenario. The var scenario is very important in the test framework of Switchyard, do not forget it. We construct the scenario with a name "hub tests". Then we add three interfaces with name and MAC address on our hub. In every case, we make a packet then feed it into one interface of our hub with PacketInputEvent. Then we compare the outgoing packets from interfaces of our hub with our expectation packets using PacketOutputEvent. If there is no packet out, we use the function PacketInputTimeoutEvent to check there is no traffic for a period of time.
All test APIs used is introduced here.
You may want to run this test, we will cover this later.
Implement your device
Switchyard is the framework enables you to implement a device. A Switchyard program is simply a Python program that includes a particular entry point function which accepts a single parameter. The startup function can simply be named main, but can also be named switchy_main if you like. The function must accept at least one parameter, which is a reference to the Switchyard network object (described below). Method calls on the network object are used to send and receive packets to and from network ports.
A Switchyard program isn’t executed directly with the Python interpreter. Instead, the program swyard is used to start up the Switchyard framework and to load your code. When Switchyard starts your code it looks for a function named main and invokes it, passing in the network object as the first parameter. Details on how to start Switchyard (and thus your program) are given in the chapters on running a Switchyard in the test environment and running Switchyard in a live environment. Note that it is possible to pass arguments into a Switchyard program; see Passing arguments into a Switchyard program for details.
A Switchyard program will typically also import other Switchyard modules such as modules for parsing and constructing packets, dealing with network addresses, and other functions. These modules are introduced below and described in detail in the API reference chapter.
In the later lab assignments, you need to implement your device. Generally, your initial test files and device logic are not complete. You need to modify them step by step. This programming mode is called Test Driven Development (TDD). Here is our hub code.
#!/usr/bin/env python3

'''
Ethernet hub in Switchyard.
'''
from switchyard.lib.userlib import *

def main(net):
    my_interfaces = net.interfaces()
    mymacs = [intf.ethaddr for intf in my_interfaces]

    while True:
        try:
            timestamp,dev,packet = net.recv_packet()
        except NoPackets:
            continue
        except Shutdown:
            return

        log_debug ("In {} received packet {} on {}".format(net.name, packet, dev))
        eth = packet.get_header(Ethernet)
        if eth is None:
            log_info("Received a non-Ethernet packet?!")
            continue

        if eth.dst in mymacs:
            log_info ("Received a packet intended for me")
        else:
            for intf in my_interfaces:
                if dev != intf.name:
                    log_info ("Flooding packet {} to {}".format(packet, intf.name))
                    net.send_packet(intf, packet)
    net.shutdown()
In Switchyard, the device you want to be the hub will run this script and act like a hub by receiving any packets and forwarding to any other interfaces except the packets towards the hub itself. The APIs used in this file is introduced here.
Running in the Test Environment
[!NOTE|style:flat] You need to activate your Python virtual environment first in any case you want to run Switchyard. This step is very important. In the root dictionary of Switchyard, run
$ source ./syenv/bin/activate
You can test your hub code with your test file in Switchyard test mode. At minimum you would invoke swyard as follows.
$ swyard -t examples/hubtests.py examples/myhub.py
Note that the -t option puts swyard in test mode. The argument to the -t option should be the name of the test scenario to be executed, and the final argument is the name of your code.
After that, you will get some output shows if your tests pass or fail.
More about test environment and some debug methods are introduced here.
Running in the Mininet
In the test environment, here is no true traffic here. The device only take the packets we provided. We need to challenge the true networking. Here we have Mininet can construct a network.
First let's start our topology we provided at examples/start_mininet.py.
$ sudo python examples/start_mininet.py
Then run your hub code to the device you what. Here must be the root of our star shape topology named hub. It is better to open xterm on it so you can see the output of it.
mininet> xterm hub
Then run your hub code on it. Remember activate your Python virtual environment first. Replace <Switchyard folder path> to the path of Switchyard.
# source <Switchyard folder path>/syenv/bin/activate
# swyard examples/myhub.py
... here is your hub logs ...
Now you have your topology ready and your hub running, let's see if it works. In Mininet CLI, type pingall and return.
mininet> pingall
*** Ping: testing ping reachability
client -> X server1 server2
hub -> X X X
server1 -> client X server2
server2 -> client X server1
*** Results: 50% dropped (6/12 received)
This is the output what you will see.
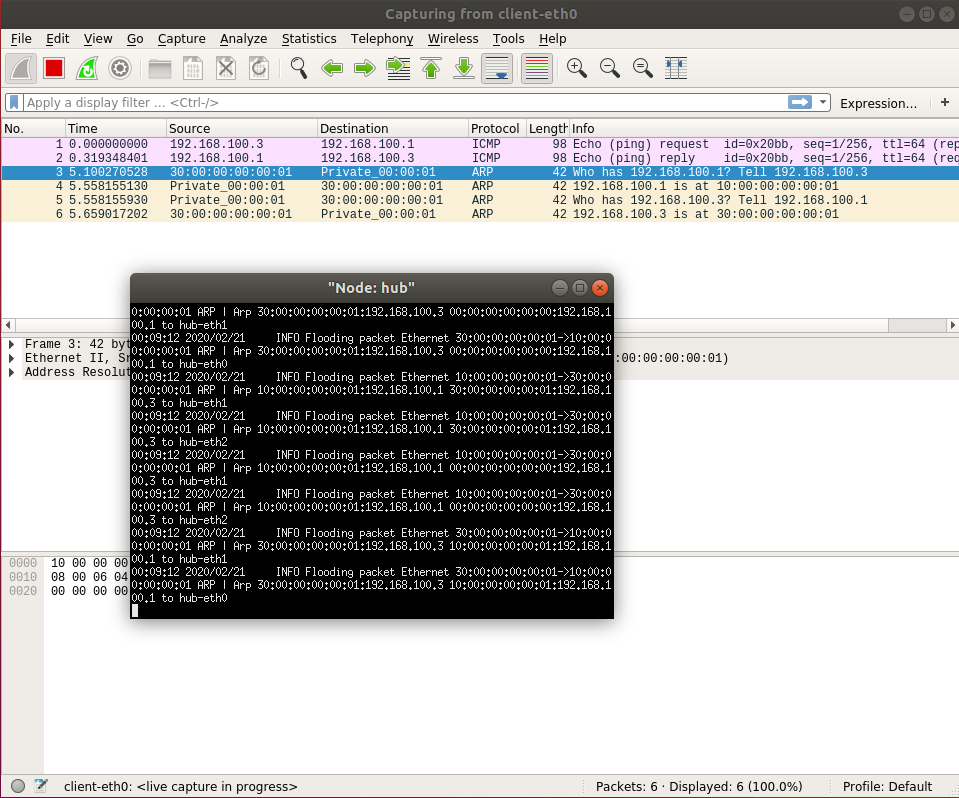
You are able to capture in Mininet too. In any host you want to capture packets, run wireshark on it. In our case, we run wireshark on the host named client. Then we ping client to server1.
mininet> client wireshark &
mininet> client ping -c1 server1