Task 3: Forwarding the Packet and ARP
Send ARP Request and Forward Packet
Once you do the forwarding table lookup for an IP destination address, the next steps are to:
- Decrement the TTL field in the IP header by 1 (you could do this prior to forwarding table lookup, too). You can assume for this project that the TTL value is greater than 0 after decrementing. We'll handle "expired" TTLs in the next project.
- Create a new Ethernet header for the IP packet to be forwarded. To
construct the Ethernet header, you need to know the destination
Ethernet MAC address corresponding to the host to which the packet
should be forwarded. The next hop host is either:
- the destination host, if the destination address is directly reachable through one of the router interfaces (i.e., the subnet that the destination address belongs to is directly connected to a router interface), or
- it is an IP address on a router through which the destination is reachable.
In either case, you will need to send an ARP query in order to obtain the Ethernet address corresponding to the next hop IP address. For handling ARP queries you should do the following:
- Send an ARP request for the IP address needing to be "resolved"
(i.e., the IP address for which you need the corresponding Ethernet
address).
- The Switchyard reference documentation for the ARP header has an example of constructing an ARP request packet.
- When an ARP reply is received, complete the Ethernet header for the IP packet to be forwarded, and send it along. You should also create a cache of IP addresses and the Ethernet MAC addresses that they correspond to (you have done in Lab 3 Task 3). When you receive a response to an ARP query, add the IP address → Ethernet address mapping to the cache so that you can avoid doing an identical ARP query.
- If no ARP reply is received within 1 second in response to an ARP request, send another ARP request. Send up to (exactly) 5 ARP requests for a given IP address. If no ARP reply is received after 5 requests, give up and drop the packet (and do nothing else).
Lastly, refer to the Switchyard documentation details and examples for parsing and constructing packets containing Ethernet, ARP, and IP packet headers.
- Packet parsing/construction introduction
- Packet parsing/construction reference
- Ethernet header reference
- ARP header reference
- IPv4 header reference
Coding
Your task is to implement the logic described above. The start file is named lab_4/myrouter.py.
You will need to carefully structure your code to be able to receive and process incoming packets while you are waiting for replies to ARP requests. A suggested method is to create a queue that contains information about IP packets awaiting ARP resolution. Each time through the main while loop in your code, you can process the items in the queue to see whether an ARP request retransmission needs to be sent. If you receive an ARP reply packet, you could remove an item from the queue, update the ARP table, construct the Ethernet header, and send the packet. You might create a separate class to represent packets in the queue waiting for ARP responses, with the class containing variables to hold the most recent time an ARP request was sent, and the number of retries, among other things.
[!NOTE] You can create a separate Python thread to handle ARP requests. Switchyard is thread-safe and this is an acceptable pattern. You may find it easier, however, to simply handle everything in the main thread of the router.
For keeping track of how long it has been since an ARP request has been
sent, you can use the built-in time module. It has a time function
that returns the current time in seconds (as a floating point value)
(e.g., time.time() # → current time in seconds as a float).
✅ In the report, show how you implement the logic of forwarding the packet and ARP.
Testing
To test your router, you can use the same formula you've used in the past:
$ swyard -t routertests2.srpy myrouter.py
This project includes quite a bit of complexity, so inspecting variables and stepping through your program in the debugger can be extremely helpful!
If you need to step through code to see what's going on, you can add
calls to debugger() at any point in your code. When execution reaches
that line, you'll get a Python debugger (pdb) command line at which you
can inspect variables, call methods, etc., in order to understand what's
happening. This kind of debugging will, in general, be much more
effective than "printf" debugging.
Another way is using VS Code to debug, which is more convenient than using pdb. But you need to be familiar with debugging in VS Code. An example we show is in Lab 1 Task 2.
Note that the test scenario file is not included in this repository, but is available on the NJU Box.
✅ In the report, show the test result of your router.
(Optional) If you have written the test files yourself, show how you test the forwarding packets.
Deploying
Once the Switchyard tests pass, you should test your router in Mininet.
There is a start_mininet.py available for building the following
network topology:
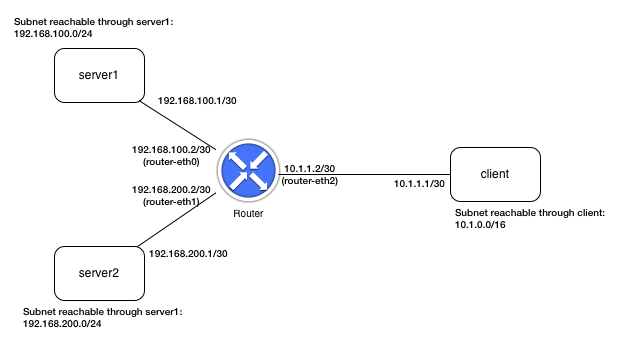
[!NOTE] The above topology is not the same as the one implied by the Switchyard tests.
To test your router in Mininet, open up a terminal on the virtual machine, and cd (if necessary) to the folder where your project files are located (or transfer them into the virtual machine). Then type:
$ sudo python start_mininet.py
Once Mininet starts up, you should open an xterm on the router node
(xterm router), and type the command below to start your router.
router# swyard myrouter.py
[!NOTE] Again, you may need to activate your Python virtual environment in order for the above command to work correctly.
[!TIP] When you run your router in Mininet, you'll almost certainly receive packets that you didn't ask for! In particular, you'll likely receive non-IPv4 and non-ARP packets (you'll likely receive some IPv6 packets and some other fun stuff). You should just ignore these non-IPv4 and non-ARP packets (and your router should not crash when it receives them!)
At this point, you should be able to open another xterm on any one of
the other nodes and send a ping (ICMP echo request) to any of the IP
addresses configured on any node in the network. For example, if you
open an xterm on client, you should be able to send a ping to
192.168.200.1 (on server2) and 192.168.100.1 (on server1). You should
also be able to send a ping to any address in the subnets
192.168.100.0/24 and 192.168.200.0/24 from the client node, and the
router should successfully forward them to either server1 or server2.
(But note that you will only get ping responses from 192.168.100.1 and
192.168.200.1 --- pings to any other IP address will not get a
response.) To test whether the router is correctly forwarding the
packets, you can run Wireshark on any of the nodes in the network. Below
is an example of starting Wireshark on the router using interface
router-eth2, then running ping on the client to send 2 ICMP echo
requests to 192.168.100.1:
On the router run
router# wireshark -i router-eth2
On the client run
client# ping -c2 192.168.100.1
You will see the Wireshark on the router-eth2 capture these packets.

Testing your router in the "live" network (i.e., in Mininet) is a major step: if it passes all the tests then works in Mininet when trying various examples of pinging hosts, you might have done things correctly!
Your task is: ping another host (client or server2) from server1. Using Wireshark to prove that your router is correctly forwarding the packets. ✅ Write the procedure and analysis in your report with screenshots.