Task 2: Basic Switch
Ethernet Learning Switch Operation
An Ethernet learning switch is a device that has a set of interfaces ("ports") with links connected to other switches, and to end hosts. When Ethernet frames arrive on any port/interface, the switch sends the frame on an appropriate output port if the switch knows that the host is reachable through that port, or floods the frame out all ports if it does not know where the host is.
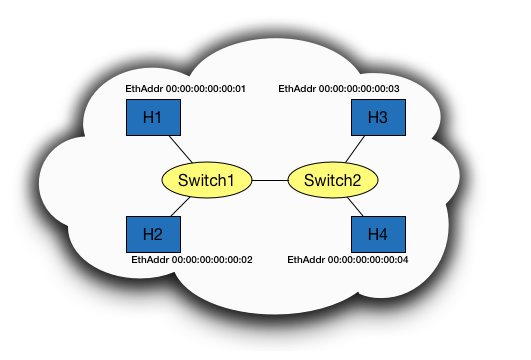
Consider the picture below. Say that Switch 1 doesn't know the locations of any host on the network, and that H1 wants to send an Ethernet frame to H3. When that frame arrives at Switch 1, it sees Ethernet source address 00:00:00:00:00:01 and destination address 00:00:00:00:00:03. From this packet arrival, it knows that it can now reach H1 by send a frame out the same interface on which this frame has arrived. However, it does not know where to send to frame to reach H3, so it floods the packet out all ports except the one on which the frame arrived. Eventually, H3 will receive the frame. If it replies to H1, Switch 1 will receive a frame with the source address as H3's address, and the frame will arrive on the interface connected to Switch 2. At this point, Switch 1 now knows exactly which ports it needs to use to send frames to either H1 or H3.
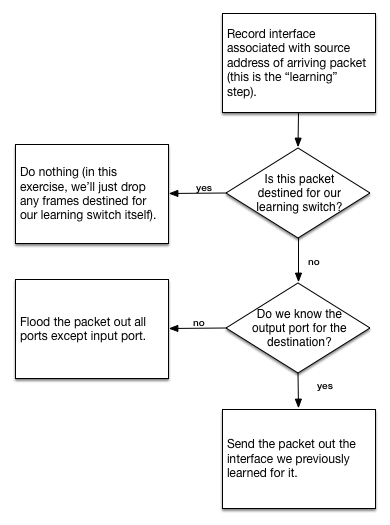
The following flowchart summarizes the example described above. The only additional considerations shown in the flowchart are if the destination address is the same as one of the Ethernet addresses on the switch itself (i.e., the frame is intended for the switch), or the Ethernet destination address is the broadcast address FF:FF:FF:FF:FF:FF.
Your switch may have a table like:
| MAC Address | Interface |
|---|---|
| ab:cd:ef:fe:cd:ba | interface-0 |
| ... | ... |
Coding
Your task is to implement the logic in the above flowchart, using the Switchyard framework. The starter file is named lab_2/myswitch.py, which is the only file you'll need to modify.
Some links to Switchyard API documentation which you may find helpful are:
- Packet Parsing/Construction Introduction
- Packet Parsing/Construction Reference
- Ethernet Packet Header Reference
Note that the documentation of Switchyard has examples on running Switchyard in test mode and in real mode, along with a walkthrough of creating a simple hub device, which is useful background material for this exercise.
Testing
You can test your basic learning switch yourself. No test results need to show in your report.
Deploying
To run your switch in Mininet, run the lab_2/start_mininet.py custom topology script. It will create a small network consisting of a single switch with three hosts (client, server1, and server2) in the following configuration.
To start up Mininet using this script, just type:
$ sudo python lab_2/start_mininet.py
Once Mininet starts up, you should open a terminal window on the Mininet node named "switch":
mininet> xterm switch
In the window that opens (xterm on the node "switch"), activate venv and run your switch in "real" (non-test) mode:
(syenv) # swyard myswitch.py
[!NOTE] Note that to run
swyardin Mininet in a root shell (such as the shell that is open in response to thextermcommand), you will need to activate the Python virtual environment which has Switchyard installed in it. Refer to the Switchyard documentation for more information.
To examine whether your switch is behaving correctly, you can do the following:
- Open terminals on client, server1 and server2 (
xterm client,xterm server1andxterm server2from the Mininet prompt) - In the server1 and server2 terminal, run
wireshark. Wireshark is a program that allows you to "snoop" on network traffic arriving on a network interface. We'll use this to verify that we see packets arriving at server1 and server2 from client. - In the terminal on the client node, type
ping -c 2 192.168.100.1. This command will send two "echo" requests to the server1 node. The server1 node should respond to each of them if your switch is working correctly. You should see at the two echo request and echo replies in Wireshark running on server1, and you will probably see a couple other packets (e.g., ARP, or Address Resolution Protocol, packets). - If you run Wireshark on server2, you should not see the echo request and reply packets (but you will see the ARP packets, since they are sent with broadcast destination addresses).
✅ Analyze and state the results of the above process in your report with screenshots. Do not explain how you do step by step but focus on the switch's forwarding logic.